Kapot: Pigeon
Asana: Pose
Rajakapotasana at a Glance
Rajakapotasana also known as the One-legged king pigeon pose & Eka Pada Rajakapotasana. Rajakapotasana comes at the end of the last series of Ashtanga yoga, which is a very advanced and challenging pose that needs good flexibility in your hips and thighs. This asana can be performed in Iyengar style, Yin form, also known as the Swan pose, or aerial form, also known as the Flying Pigeon pose.
Benefits:
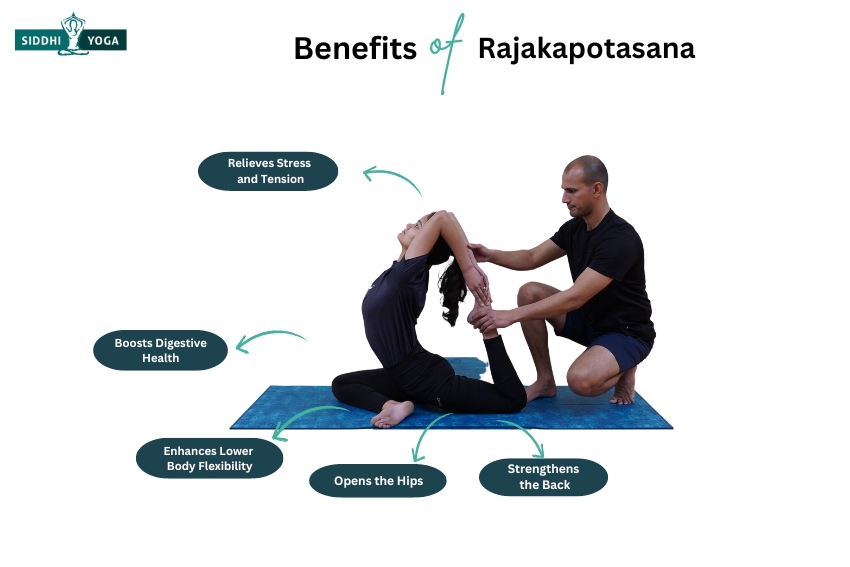
- It helps open your hips, enhances flexibility, and targets your lower body.
- It helps to strengthen your back and your abdominal muscles.
- It helps to reduce your lower back pain.
- It pressures your abdominal muscles, which keep your digestive system healthy.
- This helps to activate your Swadistana chakra.
- This can release the tension from your body and boost your mental and physical energy.
Who can do it?
Advanced yoga practitioners can do this yoga pose. This yoga pose needs a lot of strength and flexibility, so if you are the one, attempt this pose. Experienced dancers can do this pose. Sports persons can do this pose. People with good flexibility and core strength can do this pose. Intermediate practitioners can do it under the guidance of a trained yoga teacher.
Who should not do it?
Rajakapotasana should not be done by individuals who have any injury to their arms, shoulders, hips, or ankles. People who had any surgery should avoid doing the pose. Beginners should not do this pose. Pregnant women should not attempt this pose. Women during their menstrual cycle should avoid doing this pose. Senior citizens should avoid this deep hip opener pose.
How to Do Rajakapotasana?
Follow the Step-by-Step Procedure
This pigeon pose, eka pada, is an advanced pose, so Warm and Preparatory poses are a must; before you do this pose, make sure you are thorough with the poses like – the Downward-Facing Dog, the Thread the Needle pose, and the Bitilasana Marjaryasana pose.
- You can get into this pose through many poses like dandasana, table pose, and downward facing dog pose. Here we would start with the Downward dog pose.
- Get into the downward dog pose, take some relaxed breaths, and when ready bring your right leg in the front, bend the right knee, and place the hip on the mat, near your right wrist.
- Here your left leg will be straight back flat and extended and the top of your foot will be on the mat. Knees touching the mat.
- The foot of your right leg will face the right thigh (hip crease/ pelvis area), the knee pointing front and folded and placed on the ground, and the right shin toward your body.
- Now settle yourself and see if you have any sensation of pain or discomfort and if you have a problem with keeping your right hip stable, you can place a soft cushion, yoga block, or a folded blanket to support.
- Keep your hips squared and breathe deeply before you enter into the next move.
- Straighten your back and feel the stretch in your upper body.
- Inhale deeply lift your chest, lift your arms simultaneously bend your left knee, and bring your foot near your shoulder (if possible).
- Now slowly catch hold of your left foot with your left arm, support it, and join your right arm to help to hold the foot and flex a bit toward your head.
- When you have your foot in your hands, exhale and lengthen your back and neck, and tilt your head back to try touching the foot. (don’t force it, it will come with practice).
- This is the final version gaze at your comfort level and hold this pose for a few breaths, as per your physical limit.
- When you want to release the pose, inhale and release your foot slowly, bring it down to the mat, and then come to the downward dog pose and come to the child’s pose to relax and cool down before you do it on the other side.
- You can do it the same way, slow and ready on the other side (left side), with the left leg bent, placing your left hip (left thigh) on the mat and knee forward and the right leg back.
What are the Benefits of Rajakapotasana?
This is a beautiful deep hip opener pose, but a challenging one that can be helpful mentally and physically.
- It helps to open up your chest and heart.
- It helps to stretch and open up your tight hips, shoulders, neck, and chest and helps release tension.
- This pose helps to increase the flexibility of your joints and muscles and if you practice it regularly, this can also improve the flexibility of your spine, arms, legs, and neck.
- This pose stretch helps to strengthen and stretch your back muscles and abdominal muscles.
- It helps to improve blood circulation and also helps relieve mild sciatica pain.
- As this pose strengthens and stretches your back, it helps to improve your posture.
- The mindful breathing throughout the movement of the pose, enhances your focus and concentration.
Health Conditions that Might Benefit from Rajakapotasana
The Rajakapotasana pose has many health benefits if practiced with all the safety and precautions, under the guidance of your yoga teachers.
- Regular practice of One-legged king pigeonpose can help to stretch your hip flexors, abductors, psoas muscles, and other muscles which tightens and leads to discomfort and injuries.
- If you have mild sciatica or lower back pain, practicing this pose can help to reduce the tension and stiffness.
- If you have any issues with your digestive system, like indigestion and bloating, practice this pose to bring back digestion process back to normal and healthy.
- This can be helpful for people struggling with everyday stress and anxiety, by practicing this pose mindfully with your breath.
- Regular practice of this pose can strengthen your core, back, and shoulder muscles and help enhance the posture day by day and open up your chest.
- Practicing the One-legged king pigeon pose can be helpful with the mild pain and discomfort caused during your menstrual cycle.
- The pressing of the body by pushing the thighs deeper into the floor and pressing the pelvis towards the floor thus activating the muscles around the Femur Bone in the hip socket (the longest bone in the human body).
- This helps to stimulate your sexual organs and also improves the blood flow to your sexual organs and helps improve your sexual performance.
Safety and Precautions
- If you are suffering from any hip or knee injury, avoid the One-legged king pigeon pose or modify it under the guidance of your yoga teacher and also consult your health care professional for safety.
- If you have any issues with your back or shoulder, avoid this pose or you may end up with an injury.
- Being an advanced pose, warmups and stretches are very important to loosen up the muscles.
- Be aware of the sensations in your body and act accordingly.
- Avoiding your breath or holding your breath while doing the pose. To comfort your body and to support, modify the One-legged king pigeonpose initially.
Common Mistakes
- Don’t try to compete with others, focus on your physical limits and get to the final pose gradually.
- Lack of focus on stretching the groin and the lower abdomen.
- Missing to perform the strengthening poses and other basic backbend poses to support this advanced pose
- Avoiding the alignment procedure for the One-legged king pigeonpose.
- Your leg at the back should be in a neutral position.
- Avoid collapsing on the hip of the bent knee.
- Avoid putting weight on one side hip, use support under the right buttock.
- Don’t put much pressure on your hamstrings.
- Lack of patience and consistency when practicing this pose.
- Just rushing into the pose and rushing out (exiting) of the pose.
Tips for Rajakapotasana
- Beginners for this pose can be difficult to stretch the outer hip, so can keep the right foot close to the right hip.
- You can keep the front foot shin parallel to the hip or let your ankle be close to the groin.
- Flex your front leg toes and avoid putting too much pressure on your knee.
- Avoid pressurizing the back knee.
- Preparatory yoga poses are important like the half pigeon pose, butterfly pose, lizard pose, downward facing dog pose, Uttanasana pose, Bow, seated postures with a backbend, and Cobra yoga pose.
- Keep your hips squared and if the front hip is not comfortable, just keep a cushion, or folded blanket undeath to support.
- Your back should be straight and lengthened.
- Your right and left elbow should point upward while holding your left toes or ankles.
- Don’t hunch your shoulders, shoulders should be broad, and roll it back and down.
- Modification is the key to a safe and comfortable pose. So, modify it with props like using yoga straps, yoga blocks, rolled-up blankets, or soft cushions for the One-legged king pigeon pose.
- Focus on your breath, which is important for the movement of the pose and balancing the pose.
- Your core muscles should be engaged, it helps to protect your lower back and stabilizes the pose.
- Initially when you begin this pose, do it under the guidance of your yoga teachers.
- Be mindful and aware of how you feel during the full pose.
- Do the relaxing poses, like the child’s pose (forward bend).
Physical Alignment Principles for Rajakapotasana
- Your front leg can be bent at an angle of 90 degrees or less.
- Your front leg and outer calf should be on the mat.
- You can bring the front leg heel closer to the pelvis area and reduce the stress on the knee.
- Keep your pelvic floor activated.
- folded, knee pointing in the front.
- Keep your hips squared and to balance your hips, use props like a yoga block or rolled blanket.
- Weight should be evenly distributed between both hips.
- Both your knees are bent in the final version of the pose.
- Left heel (left leg) pointed down.
- the upper arm is stretched in the armpit.
- Back leg extended backward (rear leg), legs bent, and the calf raised and your thighs are still on the floor.
- Your back should be lifted toward your head and your toes pointing up.
- Let your spine be lengthened and straight, keep a gentle backbend.
- Shoulder blades pulled up towards each other and let your shoulders be relaxed.
- Both your hands should be holding the back foot (you can use the yoga strap for support) and elbows pointing upward.
- Tuck your navel into your spine and engage your core muscles.
- Open up your chest and lift up and forward.
- Your crown of the head should be up and gaze straight but comfortably.
- Do it with both legs, first with your right leg in front and then sliding your left knee forward.
Rajakapotasana and Breath
As for any other yoga pose, breath is vital for this pose and you need to move your body with the engagement of your breath, the same as you dance with music. With regular practice, your breath will form a rhythm with your movement and help you relax and increase your awareness.
Take a deep breath and elongate your spine and this helps to open your chest, which engages your diaphragm and creates a deeper stretch to your hips and groin area. Inhale and lift your arms over your head, bend your back foot, and try to join your arms and leg by holding it with a deep exhale and engaging your core. Inhale and exhale and tuck your navel to your spine give a slight bend to your upper back and exhale, trying to touch the back of your head to the raised back foot. Keep breathing and relax and gaze forward with all the confidence and feel the boost of energy into your body and mind.
Rajakapotasana and Variations
- Modify the pose with some props like – Blocks under your hips or, a soft cushion or rolled blanket.
- You can use yoga straps to reach the foot initially and gently pull your heel toward your buttocks.
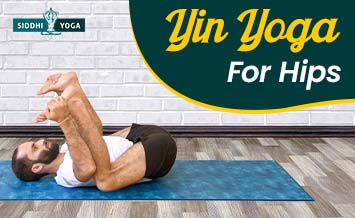
- Other variations are – Half Pigeon pose.
- Sleeping swan pose
- Supine pigeon pose, lying on your back with knees bent, and feet flat on the ground, right ankle on top of the left thigh, Lift your left foot from the floor. Keep both feet flexed. Reach your right hand through your legs and your left hand around the leg and clasp your fingers.
- Flying pigeon pose.
- Half pigeon pose variation 1
- Mermaid pose – Bend your left knee and try to hold you’re your left foot with your left hand at the back. Hold the foot on the inside of the elbow of the left arm. When you have the left foot tucked, bring your right arm up and take it back to clasp the left fingertips or wrist.
The Bottom Line
This is a beautiful yoga pose and stretches the entire body, but if you practice safely take all the precautions. This advanced pose can be reached, one step at a time gradually and by getting guidance from the yoga teacher. If you have any health concerns reach your health care professional for better support and advice.
Follow all the physical alignment procedures while doing the pose. Slow and steady can lead you to the perfect pose and use props if needed. Patience and consistency are the key that works in the long run and engage your breath as the rhythm throughout the movement. This pose offers you many physical and mental benefits. It builds your confidence level and improves awareness and self-love.
Take Your Practice to Next Level
To practice advanced poses like Rajakapotasana join our 200-Hour Online YTT, yin yoga teacher training or 300 Hour Yoga Teacher Training certified by Yoga Alliance, USA. This course will provide you detailed instruction on a wide range of poses and techniques and will ensure you practice safely and effectively. Or start with our 14-Day Free Trial to try out our courses. These courses are good for your overall mental and physical health and will help you to build a strong career in yoga. Join us to deepen your practice, strength and confidence and balance and mindfulness in your yoga journey.